Ασύρματος τηλεχειριζόμενος διακόπτης στα 433MHz DC 12V με δύο χειριστήρια και ένα δέκτη με τέσσερα κανάλια ρελέ. Ο δέκτης αποτελείτε από τέσσερα ρελέ και έχει είσοδο 12 βολτ. Ο ρελές είναι ξερή επαφή και μπορεί να συνδεθεί οτιδήποτε που λειτουργεί με 220 βολτ, 12 βολτ ή ξηρή επαφή on off
433Mhz Universal Wireless Remote Control Switch DC12V 4 Channel Relay Receiver Module and RF Transmitter & 4 Keys Remote Control
Application areas:
Remote control garage door\remote control door\remote control light\remote control curtain\ and various electrical equipment
Product Specifications;:
KT16 remote control data,
Operating frequency: 433.92 MHz
Battery model: CR 2016 (3 V)
Material: PVC.
Button: 4 buttons
Size: 70 mm x 40 mm x 12 mm
Working voltage: DC12V
Working current: 12 mA @ 12 V.
Transmitting power: 10mW @ 12V
Modulation mode: ASK (AM).
Coding type: learning type. 1527EV1527
Launch distance: 15-20 meters (inside), 50-100 meters (outside open area)
Product specifications:
Receiver (KR1204) electronic characteristics:
1. Input voltage: DC12V
2.Output voltage: determined by the voltage connected to the common port (COM)
(1) DC5V-12V.
(2) AC85-240V
3. Code: EV1527
4. Loop current limit: 5A
5. Quiescent current: 5mA
6. Working frequency: 433Mhz
7. Receive sensitivity: -104dBm
8. Function options: instantaneous / switching / latching
9. Modulation mode: ASK
10. Matching mode: intelligent learning code
11.The receiver can be matched: 35 remote controls
12. Maximum power: 2000 watts
13. Receive signal distance: 50-100 meters. (open land)
14. Channel: 4 channels (4 devices can be connected)
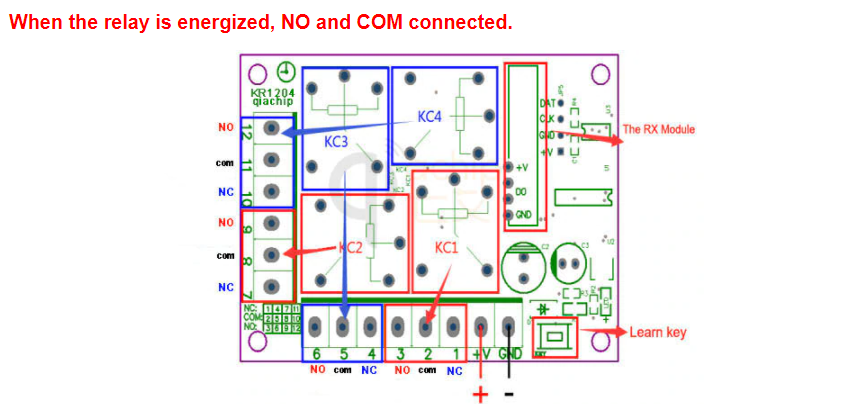
Pin function:
+ V: positive input
GND: negative input
1. KC1 Normally Closed Relay (NC)
2. KC1 Relay General (COM)
3. KC1 normally open relay (NO)
4. KC3 Normally Closed Relay (NC)
5. KC3 Relay General (COM)
6. KC3 normally open relay (NO)
7. KC2 Normally Closed Relay (NC)
8. KC2 Relay General (COM)
9. KC2 normally open relay (NO)
10. KC4 Normally Closed Relay (NC)
11. KC4 Relay General (COM)
12. KC4 normally open relay (NO)
Order Package Include:(4 order model can be chosen)
Order model 1:
1 piece KR1204 and 1 remote control
detail:
Receiver Switch Module (KR1204): 1 piece, with plastic housing
Remote control (kt16): 2 pieces, with battery
Please Note: the Receiver Switch Module part number KR1204-4 have 3 ways of working mode.The OUTPUT signal have 2 Voltage Level. It decided by the IMPUT of the COM pin.
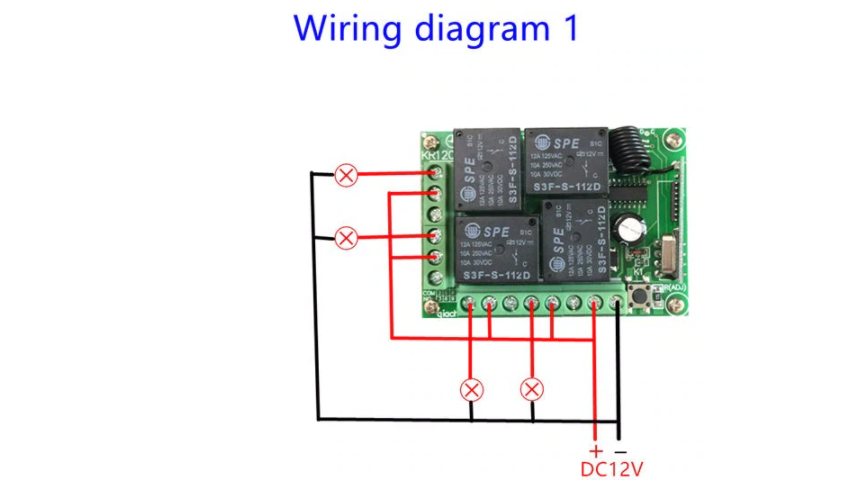
OUTPUT mode 1:
Connect the COM to the Power Supply by DC12V, the Output pin will create DC12V Signal. Please check below diagram for better understanding.
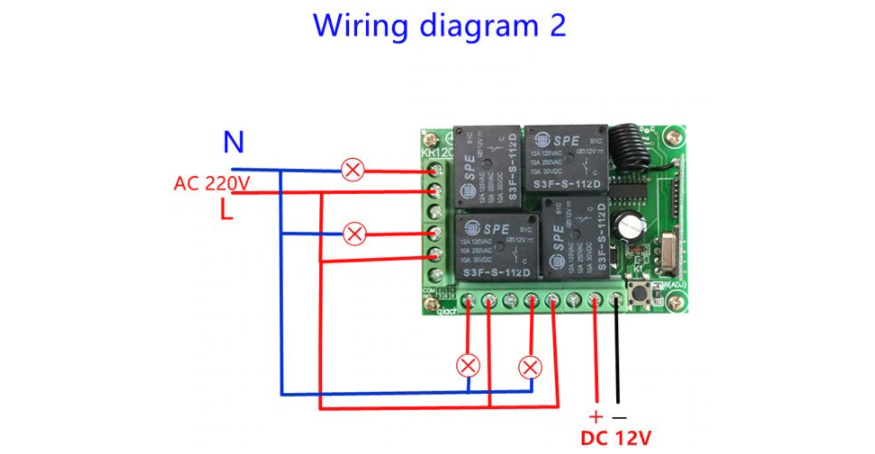
OUTPUT mode 2:
Connect the COM pin with any other Additional Power Supply,the output will create the same Voltage signal as the Additional Power Supply. it can be Direct Current or Alternating Current. Decided by the Additional Power Supply.
BUT, Please note: the additional Power Supply should be in the range of the Receiver Switch Module-(DC5-12V, AC 85-240V).
Please check below diagram for better understanding.
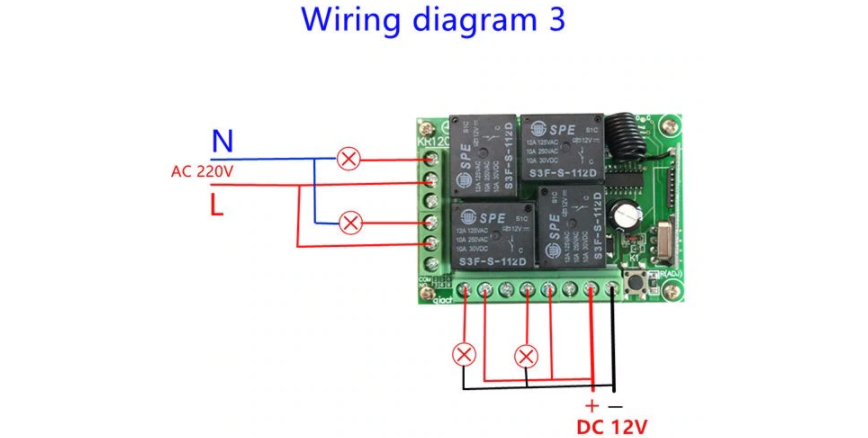
OUTPUT mode 3:
Mix work mode: You can also make 2 channel work under the DC output mode, and 2 with the AC output. Please check below diagram for better understanding.
4 keys (A, B, C, D) remote control and DC12V4 channel receiver operation method:
Step 1: Clear the original memory in the receiver
Press the Learn button on the receiver 8 times and wait for the LED bulb on the receiver to flash 5 times. The code will be cleared.
After clearing the code, the entire remote will no longer work.
Step 2: The 4 button (A, B, C, D) remote control can be configured in 7 modes:
1: Instant mode:
Press the learning button on the receiver once to enter the switch setting mode. .
Wait until the LED indicator lights up and enters the learning state.
Press the “A” button on the remote control and then press the “B” button. The LED bulb on the receiver board flashes 3 times and then goes out.
Successful learning. The coding was very successful.
Press the "A" button on the remote control and the relay turns on. Release the “A” button on the remote control and the relay will turn off.
Press the "B" button on the remote control and the relay will turn on. Release the “B” button on the remote control and the relay will turn off.
2: Self-locking mode:
Press the Learn button on the receiver twice to enter the switch setting mode.
Wait until the LED indicator lights up and enters the learning state.
Press the “A” button on the remote control and then press the “B” button. The LED bulb on the receiver board flashes 3 times and then goes out.
training. The coding was very successful.
Press the "A" button on the remote control and the relay turns on. Then press the “A” button on the remote control and the relay turns off.
Press the "B" button on the remote control and the relay will turn on. Then press the “B” button on the remote control and the relay turns off.
3. Lock mode:
(A), clear the memory code in the receiver again:
Press the Learn button on the receiver 8 times and the code will be cleared.
After clearing the code, the entire remote will no longer work.
(B) Press the "Learning" button on the receiver three times. Enter the switch setting mode.
Wait until the LED indicator lights up and enters the learning state.
Press the “A” button on the remote control and then press the “B” button. The LED bulb on the receiver board flashes 3 times and then goes out.
training. The coding was very successful.
Press the remote control button "A", the relay is connected (start operation), then press the remote control button "B", the relay is disconnected (stop operation). Another channel is open (beginning to work)
Press A to stop. B is open. Press B to stop and press A to open. Convert to each other.
4. 2CH instant + 2CH switching:
Press the four times of the learning button on the receiver board (the LED on the receiver board will simultaneously signal), then press any of the remote buttons to send three signals through the remote control LED to inform the setting.
5. 2CH instant + 2CH latch:
Press the learning button on the receiver board five times (the LED on the receiver board will simultaneously signal), then press any of the remote buttons, and the LED will be sent three times through the remote control to signal the setting.
6. 2CH Toggle + 2CH Latch:
Press the learning button on the receiver board six times (the LED on the receiver board will signal at the same time), then press any of the remote control buttons, and the LED indicator from the remote control will send three times to signal the setting success.
7. 2CH latch + 2CH latch:
Press the seven times learning button on the receiver board (the Led indicator on the receiver board will simultaneously signal), then press any of the remote control buttons, and the remote control LED will signal three times to indicate that the setting is successful.